Interactive Maps is a feature available on Memory Alpha that allows users to design their own customized maps and diagrams.
Getting started
Any emailconfirmed user can create and edit Interactive Maps. There is an "Interactive Maps" link in the Explore menu of the top navigation that leads to Special:AllMaps, where you can create your own Map and find a list of every Map that exists on Memory Alpha.
Interactive Maps reside in the "Map" namespace. Maps created in any other namespace, including a userspace subpage, will not be correctly generated. When creating a Map via the button on Special:AllMaps, this namespace is automatically added, omitting the need to make this part of the page title.
Unless you have set your preferences to use the source editor, the "Edit" button at the top right of any page in the Map namespace will open the visual Interactive Maps Editor, which is a user-friendly option to edit Maps quickly and easily. Clicking "Edit source" from the dropdown menu will instead take you to the source editor and load the base JSON structure for the Map. If you have the source editor selected as your preference, these options are reversed and the button in the dropdown reads "Edit map". Clicking the pencil icon present on the map itself will always open the visual Interactive Maps Editor, regardless of your preferred editor. While inside the visual Interactive Maps Editor, hovering over the button with the three vertical dots will open a dropdown with the option to "edit source".
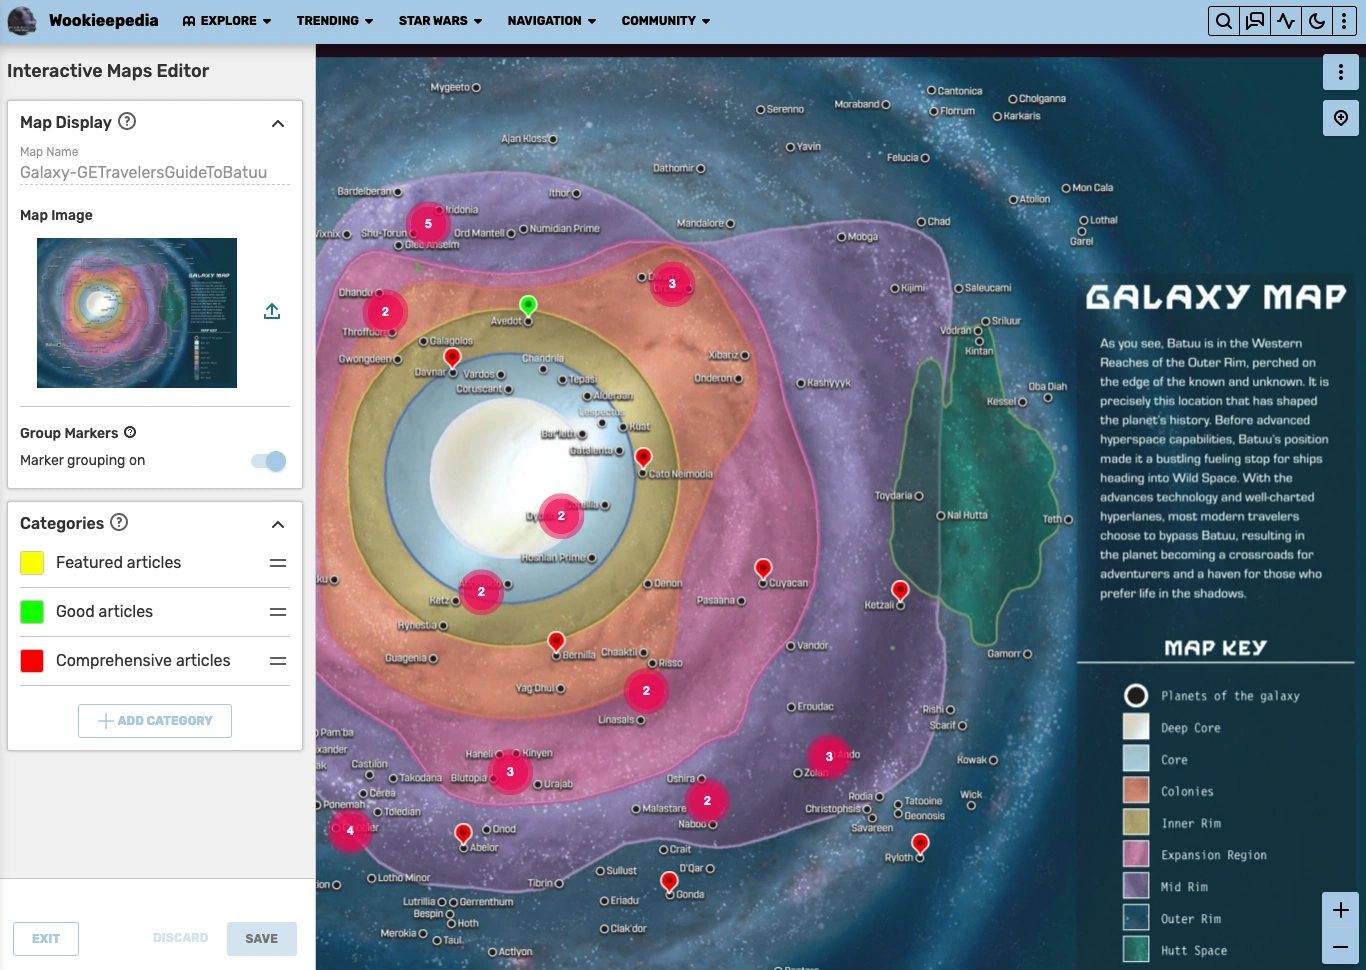
Building a Map using Interactive Maps Editor
Interactive Maps Theme Designer
Map display
This section allows you to view your Map name, upload a Map image as your background, and group markers that are in close proximity.
- Map Name: This is the title of your Map. Your Map will be viewable using the URL
/wiki/Map:My_New_Map, where My New Map is the name that you chose. If you wish to change the name after the Map's creation, hover over the button with the three vertical dots in the top right-hand corner on the Map itself and select the option "move". This will close the Interactive Maps Editor and take you to Special:MovePage. - Map Image: Click on this area to upload the image you would like to use for your Map. You can upload a .jpg, .jpeg, .png, or .svg. The maximum file size is 10 MB.
- Group Markers: Toggle this option "on" to simplify the number of markers on a Map by grouping ones that are in close proximity. If you click on a grouped location, it will zoom in and show a sub-group or individual markers in a selected location. We recommend grouping large numbers of markers for a better viewing experience.
Categories
Organize markers of a similar kind by grouping them into categories. This list will appear next to the Map and allows you to filter markers by categories.
- Creating categories: Click the "+ Add Category" button to create a new category.
- Renaming categories: Click on the category name to change it.
- Re-ordering categories: Grab hold of the horizontal bars on the right of the category and drag to re-order the categories in the list.
- Deleting categories: Clicking on the category name will transform the horizontal bar into a trashcan icon to give you the option to delete the category.
- Customizing category markers: Click the pin icon on the left of the category to open a menu that allows you to customize how markers are displayed for that category.
- Background color: This will change the color of the marker icon. Click on the colored square to select a color using the color slider or input a hex code in the field to the right.
- Emoji or Character: You may choose to add an emoji or single character as a customization option within category markers. This field has a 1-character limit. After adding an emoji or character, it will be displayed inside the default marker icon in place of the dot in the center. To delete the emoji or character, click the X on the right of the input field.
- Custom icon: Click on this area to upload an image file as a custom icon image for the category, which will replace the default pin icon. The permitted file types are .jpg, .jpeg, .png, and .svg. The file size for the icon should be between 32×32px and 64×64px. Once uploaded, there is an option to replace or delete each custom icon individually.
- While the options to either upload a custom icon or use an emoji/character are always enabled, both cannot be active at the same time. In order for the emoji or character to be displayed, you cannot have a custom icon image in use. Uploading an icon image after choosing an emoji will override the emoji and replace it with an image.
Markers
To add a marker to your Map, click the pin icon in the top right-hand corner. Move your cursor to the desired placement on the Map and click to drop it. After you place the marker, a menu will come up with several options that control how your marker will appear on the Map:
- Title: This is the name of your marker/location. It must be 50 characters or less.
- Description (optional): This description will be displayed under your title in the pop-up window when your marker is clicked on. It must be 150 characters or less.
- Link (optional): You have the option to link to any article on your wiki (perhaps one that gives more detail on the selected marker/location).
- Page title: Put the name of the article you would like to link in this field. It does not matter whether you use spaces or underscores for article names.
- Link display text: Choose how you would like the link text to be displayed. It could be the same name as the article or something like "See more". This field is required if you link a page title.
- Category: Select which category you would like your marker to be grouped in. Each marker must be associated with a category to better group similar markers.
Once a marker is created, you can drag it to a different location on the Map if you so choose. You can also click on the marker and hover over the three vertical dots to bring up options to edit or delete the marker.
Additional functions
- Zooming: Use the + and - buttons in the bottom right corner to zoom in and out of your Map. You can also use the scroll/mouse wheel.
Hovering over the button with the three vertical dots will open a dropdown with the following options:
- Edit source: Clicking this will take you out the visual Interactive Maps Editor and to the JSON code of the Map. If you wish to return to the visual Interactive Maps Editor, you need to exit the source mode and click the edit pencil on the Map again.
- History: This will take you out of the editor and to the page history of the Map, showing you all edits and changes made by anyone and giving you the option to undo them if necessary.
- Move: This will close the Interactive Maps Editor and take you to Special:MovePage, where you can choose a new name for your Map.
Additionally, the following extra options are available to content moderators and administrators:
- Protect: It opens the options for protecting your Map.
- Delete: This will delete your Map. You can always restore it if you did this by accident.
As you are making edits, the preview window will display your changes in real time, so you can see how your Map will look before you save it. When you are finished, click the "Save" button and your new Map will now appear on Memory Alpha!
Building a Map using JSON in Source Editor
Every Interactive Map is defined in JSON (JavaScript Object Notation). The following fields should be defined in order to generate the Map:
mapImage(required) – name of the file that will be used as the map background image. The image must be uploaded to the wiki (e.g. usingSpecial:Upload). The following file extensions are supported:jpg/jpeg/png/svg.mapBounds(required) – bounds defining the edges of the map, given as a2x2matrix of integers.categories(required) – list of categories that will be displayed in the filters list (the dropdown menu found top-left of the map).markers(required) – list of markers that will be displayed on the map. Each marker must be associated with a defined category.origin– location of the origin point [0,0] in the coordinate system.- Possible values:
bottom-left(default) ortop-left.
- Possible values:
pageCategories(optional) – category of the page.["Foo"]will put the map into "Category:Foo".defaultSort(optional) – Used to change the default sort key, which influences the position that the map appears in category pages. If not present, the map is sorted using its page name (i.e. without the Map: namespace prefix).description(optional) – add a text description above your Map in the Map namespace to tell viewers as well as Google what this Map is about and how it fits into the context of your wiki. It will also feed future map search results. The character limit is 200.coordinateOrder(required) – order of coordinates used in defining map bounds and marker positions.- Possible values:
xy(default) oryx.
- Possible values:
Categories
Categories are a group of markers of the same kind. Each marker category is defined through the following fields:
id(required) – uniquely defined ID for each category, matched with thecategoryIdproperty of each marker. Any string is valid as an "id".listId(required) – ?name(required) – name of the category, which will be displayed in the filters list.color(required) – color each marker category will appear with, which can be given in hex colors or named colors. Categories with an invalid color field will display as black.symbol(optional) – add a single Unicode character or an emoji to the center of the default pin. The character may be represented either verbatim (by typing or pasting it into the field), or by using a JavaScript-escaped UTF-16 hex code in the format\u<hex>(see a list of example codes for emojis here, e.g.\ud83d\ude04to generate 😄).symbolColor(optional) – When choosing a single character, you must choose its color by adding the hex code (e.g. #FF0000) or color name (e.g. red). Be mindful of accessibility and the contrast with the marker color. Note that when you edit the character later via the Interactive Maps Editor, the character color will automatically change to black or white depending on the marker's background color.icon(optional) – icon image of the category, which will replace the default pin icon. The file used for the icon should be between 32x32px and 64x64px and allowed formats are svg, png, and jpg.
Markers
Each individual marker is defined through the following fields:
categoryId(required) – category associated to the marker.position(required) – coordinate position of the marker, within the givenmapBoundsand in the order defined bycoordinateOrder, as an array of two numbers. A marker at the position[0, 0]will be shown at either the bottom-left or the top-left corner of the map, depending on theoriginfield.popup(required) – properties of the pop-up box that appears when a marker is clicked on:title(required) – title of the marker. Each marker title has a strict 50-character limit.description(optional) – description to be displayed in the pop-up. Each marker description supports wikitext and has a strict 300-character limit. Escaped characters (\n,\",\', etc) count as a single character.link(optional) – article link to be added to the pop-up. Marker links are optional, but if included, must be defined with both aurl(the article title to be linked to) and alabel(the link text to be displayed). The URL can link to both full articles and article sections. Interwiki links and external links are not supported.image(optional) – image to be shown in the pop-up. The image will be placed under the title and description and above the link. The image is automatically sized to fit inside the pop-up container, at a width of 264px.
id– a unique ID for each marker that can be used to link directly to a specific marker.
Example
{
  "origin": "bottom-left",
  "coordinateOrder": "xy",
  "mapImage": "File:MapBackground.jpg",
  "mapBounds": [[0, 0], [1000, 1000]],
  "categories": [
    { "id": "1", "name": "Artifacts", "color": "#ff00ff" },
    { "id": "2", "name": "Dungeons", "color": "#00ff00" }
  ],
  "markers": [
    {
      "categoryId": "1",
      "position": [500, 300],
      "popup": {
        "title": "A Sword",
        "description": "Very important artifact",
        "link": {
          "url": "Article about a sword",
          "label": "See more"
        }
      }
    },
    {
      "categoryId": "2",
      "position": [300, 500],
      "popup": {
        "title": "A Cave",
        "description": "Very scary dungeon",
        "link": {
          "url": "Article about a cave",
          "label": "See more"
        }
      }
    }
  ]
}
Viewing a Map
Filters
Maps have a filters menu that allows them to show or hide a specific marker category, if you want to see only a specific one. Select "Select all" to show all map markers, or select specific categories to only see markers from that category.
Markers
Markers identify points of interest on the map, and can be selected to display the associated popup.
Markers are created in HTML in the same order in which they were created in the visual editor, or the order in which they are present in the markers array of the JSON. This influences the sort order, the Z-order that markers are displayed in from back-to-front. For example, a marker defined last in the JSON will overlap all other markers that may be surrounding it. It is common practice to sort markers by their Y position, in ascending order (when using an origin of top-left) or descending order (when using an origin of bottom-left), so that markers towards the top of the map are shown behind markers towards the bottom.
The marker order also influences the tab order; the order in which focus is cycled when pressing Tab (↹) and Shift-Tab.
Marker clusters
For ease of display, markers are grouped locally into clusters. Hovering over a cluster will show an outline of the area of the markers contained within that cluster, with the number indicating the quantity. Clicking on a cluster will zoom into that area.
There is currently no way to adjust the sensitivity of the clustering.
Popups
Popups display more information about the marker, including a title, a description, image, and an optional link pointing to a relevant page. A popup can be shown by clicking on a marker, or pressing the enter/return key if a marker is focused. A popup can be dismissed by clicking anywhere on the map outside of the popup, by clicking on a marker to show a different popup, or by pressing the enter/return key. Only one popup can be displayed at a time.
A dropdown menu (⋮) in the corner of the popup can be clicked to display more information:
- Copy link: - Copies a link to the marker to the clipboard. When the link is followed, the map will zoom in to bring the marker into focus and will show its associated popup. See below for more information.
Other features
- Panning: The map can be panned/moved around by clicking and dragging anywhere within the the display area. Either left, middle, or right mouse button can be used. In addition, the arrow keys can be pressed to move the map cardinally in small 80px increments, or in larger 240px increments if the shift key is pressed. When the map is moved too far beyond the edge of the window, or such that a displayed popup is no longer in view, it will automatically snap back into view.
- Zooming: The map can be zoomed in a variety of ways. Performing any momentary zoom action (with the exception of double-clicking) while holding the shift key will zoom the map at a magnitude of 3x.
- By clicking the + and − buttons in the bottom right corner, which will zoom into the center of the map.
- By pressing the plus (+) and minus (−) keys on your keyboard, likewise.
- By scrolling with the mouse scroll wheel, which will zoom into the position under the cursor.
- By double clicking (to zoom in) and shift-double clicking (to zoom out), likewise.
- By clicking and dragging the mouse while pressing the shift key, which will zoom the map to a specific rectangular area.
- Edit: All maps will have a pencil icon in the top right. Clicking this will open the Interactive Maps Editor in a new tab, allowing it to be edited directly.
Embedding a Map
To get more eyes on your Map, you can embed it into a mainspace article if you wish. Once the Map has been created, it can be transcluded into an article using {{Map:My_New_Map}} wikitext syntax.
Like templates, more than one Map can be embedded in an article. Maps embedded in articles will have an edit button at the top right of the Map. Clicking this will open the Interactive Maps Editor in a new tab, allowing it to be edited directly.
Aligning and placement
By default, the map will take up 100% of the width of the containing element (i.e., if it's placed in the middle of an article, it will expand to the full width of the page). You can manipulate its placement by embedding it inside a <div> element or table, which allows you to specify alignment, width, and other properties.
- Note that in order for a map inside such an element to fit in the article properly, it must be 530px wide or less.
For maps placed next to a sidebar or other floating elements, you can adjust the embed to fit flexibly using style="display:flow-root" in a surrounding div. Alternatively you can move it below floating elements (so that it appears after the sidebar) with style="clear:both" before the embed.
Also, you can place a Map inside a sidebar, although this will greatly limit its functionality.
Linking to markers
Map markers can be directly linked to by including the query parameter marker=marker_id in an external link to the map, where marker_id is the ID of the marker that should be displayed.
As an example, on the Avatar Wiki, the following link will link to a marker with the ID 42 on the Avatar world map: https://avatar.fandom.com/wiki/Map:Avatar_world_map?marker=42. This can be generated in wikitext using the fullurl magic word. For example:
{{fullurl:Map:Avatar world map|marker=42}}→ https://avatar.fandom.com/wiki/Map:Avatar_world_map?marker=42[{{fullurl:Map:Avatar world map|marker=42}} Jang Hui]→ Jang Hui
This works when linking to the map page itself, or on any page where the map is embedded. If multiple maps exist on the page being linked to, the marker matching the ID across all embedded maps on said page will be focused, not just the first.
Note that marker links can be used with a page anchor ('#'), as long as the anchor tag goes after the query string. However, the anchor will be ignored, and the map will be automatically scrolled to instead, assuming the marker ID is valid and the map is visible when the page loads. This may be used in a Tabber-embedded map to switch to the specific tab, scroll to the map (and not the start of the tab since maps override anchoring), and then focus on a marker at the same time (for example).
Reporting markers
Logged-in users can report a marker by clicking the three vertical dots (⋮) on the marker pop-up and selecting the "Report Marker" button. A successful report is indicated by a banner notification in the bottom left corner, and the "Report Marker" option in the menu will change to "Already Reported". This is only visible to the user who reported that marker. A previously dismissed marker cannot be reported again for 30 days by the same user. Anonymous users cannot report a marker at all.
Reviewing reports
Only administrators and content moderators will see any visible indicators that a marker has been reported and have the ability to address marker reports. The following moderation tools and report indicators will be available to them:
Special: Reports
Reported markers will appear on Special: Reports. This page can be found as a separate tab on Recent Changes, titled Map Reports, after the Image Activity tab. Anyone able to edit a Map can edit or even delete a reported marker, but only a saved edit or the deletion of the Map by a moderator will dismiss the report. Dismissed reports will remain visible (but grayed out) on this feed for 30 days after the moment of reporting. Active reports are visible indefinitely.
Viewing reported markers on Special: Reports, a moderator has the following options:
- Review: Clicking this will take you to the Map in the Map namespace with the marker tooltip automatically opened. If the reported marker has been deleted in the meantime, you will just be taken to the Map, which should be an indicator for you to check the Map's history for marker deletion. The report for a deleted marker can only be removed by clicking "dismiss" on
Special: Reports. - Dismiss: Dismissing a report from
Special: Reportswill gray out that entry and simultaneously dismiss all reports for that marker in case it was reported multiple times. You can still click on the title of the marker to be taken to the Map and have the tooltip open directly.
While viewing a Map
When viewing a Map as a moderator, the following elements indicate that a marker has been reported:

Reported pins are visually marked to moderators
- There will be an icon next to a marker or marker cluster. In case of the latter, the indicator icon will show the amount of markers inside the cluster that have been reported.
- When opening a marker tooltip, there will be a bar message at the top saying "Reported by <Username>" or "Reported by <Username> and <number> others." Clicking on the username will take you to the reporter's profile page.
- When accessing the marker menu via the three vertical dots (⋮) on a marker with active reports, there will be an option to "Dismiss Report" rather than "Report Marker".
- After clicking "Dismiss Report" from the marker menu, a banner notification in the bottom left corner will indicate a successful dismissal, and the indicator and tooltip bar message will disappear.
Visual Interactive Maps Editor
When a moderator opens the visual Interactive Maps Editor, the report icons will remain visible next to the reported markers. When editing the Map via the JSON editor, there are no indications of which marker has been reported, and the moderator will have to search for the marker based on the marker's title.
Useful links
- First announcement of Interactive Maps
- 2022 update for Interactive Maps
- Full launch of Interactive Maps
Map examples
- Avatar Wiki: Map of the World of Avatar
- Pillars of Eternity Wiki: Over 170 comprehensive maps
- Starlancer Wiki: An unorthodox use of Maps to create a starship diagram
See also
- ImageMap, a default MediaWiki extension for embedding maps based on image coordinates
- Help:Maps Extension, a default MediaWiki extension for embedding real-world maps